
Follow these simple steps to shield your privacy with a few essential tricks from the White Hats and experts in Information Security.

You are here, and I assume you have likely already read one of my previous articles, ‘No Such Agency’ and ‘The Machine’, where I explained the components of the global surveillance complex known as The Machine. In subsequent articles, I delved into the simple approaches which can be used to create your own surveillance features for your private missions without constructing a complex infrastructure. I believe you have already tried them, at least out of curiosity.
In this article, I will guide you through the simple techniques to help you protect your computer during your most critical missions, akin to those of a secret agent, when privacy is not just a word but a crucial necessity that can even save the life and keep you out of problems.
Why might you need a shield?
The majority of techniques and tools available for surveillance on individuals in the office, police, emergency services, or even aircraft monitoring are entirely legal and require no additional permits. However, there are situations where you may need to operate outside of legal boundaries abroad on behalf of your government or such federal contractor, or even for military purposes against your country’s enemies. In such cases, obtaining enhanced privacy and protection for the computer environment becomes crucial for your mission. It is essential to protect both yourself and the environment you operate in from the potential penetration and hacking.
Try to avoid violating the law while using these approaches, which have a dual nature and can be employed on both sides: White and Black.
In some cases, when you serve as a lawyer for individuals involved in criminal, shielding communications between you and your clients also becomes important and builds a defensive barrier from ‘The Machine’.
There are numerous other cases I could list, however, avoiding surveillance is not a simple task, and here is why.
General note
The issue lies in the digital trail that devices create while operating and communicating with each other, even unintentionally. Every online action you undertake leaves a digital footprint, typically stored as data on the servers of your internet or service provider. This data can then be analyzed to understand user behavior and preferences.
However, such a trail can compromise your security. As we’ve learned from previous articles, systems like ‘The Machine’ operate using a term called a Selector, which can search under various criteria, including all aspects of individual activities/actions.
For example: if a device with a certain MAC address was registered on a router or in the logs of an internet provider at a particular location, and later this device was implicated in criminal activities, the system could trace its trail based on the digital footprint. In many cases, it’s not even necessary for the MAC address to appear in both locations. Simply having that device logged into such a router with another one that leads to your actual location can make it easy for the system to track you.
It means that even if both your secured computer and your cell phone are connected to the same internet router at your home, your privacy and actual location could be compromised thereafter.
The most effective way to evade tracking is operating from the designated location(s), or each time in a new one, for your special missions, ensuring that devices from your civilian life remain unconnected (switched off) in the dedicated network. Furthermore, avoid to connect your secured computer to your home network and let’s explore the list of simple tricks I call the Enhanced Security Module, designed to shield your special warrior computer.
Also, I want to emphasize that you might need to implement all of these techniques just if you want to totally avoid tracking. However, employing any of these tricks individually will also boost privacy on any computer.
Warrior’s Workstation
Let’s think as a guy who wants to get hidden from the matrix, in our case from ‘The Machine’ which is ubiquitous.
Unfortunately, no one can be told what the Matrix is. You have to see it for yourself. This is your last chance. After this, there is no turning back. You take the blue pill — the story ends, you wake up in your bed and believe whatever you want to believe. You take the red pill — you stay in Wonderland and I show you how deep the rabbit-hole goes.”
Morpheus, from ‘The Matrix’ film.
Initially, when you’ve just bought your computer, ensure to make the purchase with cash, avoiding credit cards or electronic payments. Upon powering it on for the first time, it’s crucial to make adjustments in the BIOS to prevent making electronic trail. You will need to deactivate internal components such as Bluetooth, Wi-Fi, LAN, and the video camera, as illustrated on the picture below.

We will refrain from using these components. However, for establishing an internet connection, we will utilize a USB Wi-Fi device such as TP-LINK TL-WN823N and dispose it by burning if it’s suspected of being tracked during the certain mission.
Firstly, install the operating system (Fedora Security Lab), using for instance, your micro SD card, prepared for installation with Fedora Media Writer. Then, you will configure our software tricks to prevent tracking before initiating the Wi-Fi connection for the first time.
Let’s begin.
Hide your MAC address
The MAC address is a unique identifier assigned to all network interfaces. Since the MAC address is unique to each device, it can be used to track the device’s movements and activities across different networks. We enhance our privacy by spoofing the actual MAC address.
To accomplish this, we will utilize the systemd service on Linux. Go to the directory /etc/systemd/system and proceed to create two files: hide_mac.sh and hide_mac.service, as outlined below.
The hide_mac.sh script utilizes the macchanger program to update the MAC address with a new one. You can specify any desired MAC address within the mac_new variable.
#!/bin/bash

mac_new="d0:57:7b:11:39:c2"
net_interface="wlp2s0f3u2"

sudo macchanger --mac=$mac_new $net_interface
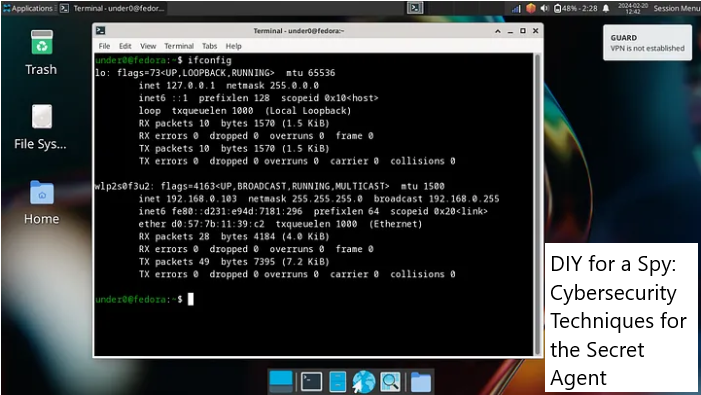
Don’t forget to update the variable net_interface with the actual name of your Wi-Fi USB module, which you can find using the ‘ifconfig’ command.
The file hide_mac.service provides a declarative description of the service and should be placed in the same folder without any modifications.
[Unit]
Description=Hide MAC

[Service]
Type=oneshot
ExecStart=/etc/systemd/system/hide_mac.sh

[Install]
WantedBy=multi-user.target
After you have finished creating these files, you have to execute the following commands in the Linux console.
sudo systemctl enable hide_mac.service
reboot
After doing so, you should be able to see the updated MAC address (d0:57:7b:11:39:c2) for your network interface (wlp2s0f3u2) in ‘ifconfig’, as shown on the screenshot bellow.

According to the service description in the file hide_mac.service, changing the MAC address should occur each time the user powers on the computer. This is level zero in enhancing your security.
Did you know that on an iPhone, the actual MAC address is hidden by default? When the device connects to the Wi-Fi network, iOS generates a random MAC address, known as a private address, for each Wi-Fi network the device connects to. It appears that iPhones are on the right side for enhancing the privacy and security of its customers.
Hide your DNS location
Hiding your DNS location is crucial for shielding your privacy. Avoid using your service provider’s DNS servers, as they can potentially lead to DNS leaks. Instead, always configure your own list of DNS servers. By doing so, you prevent anyone from determining your provider’s location and consequently, your own address.
To setup this, we will use the same as in the previous step systemd service on Linux. Go again to the directory /etc/systemd/system and proceed to create three files: hide_location.sh, hide_location.serviceand hide_location.timer, as shown below.
#!/bin/bash

dns_default="192.168.0.1"
dns_opendns="208.67.222.222 208.67.220.220"
net_interface="wlp2s0f3u2"

if sudo resolvectl status | grep -q $dns_default; then
    sudo resolvectl dns $net_interface $dns_opendns
fi
As you may see in the listing above, the script checks if the default DNS server is set up to your router’s and in this case changes it to the list of OpenDNS servers, which are more secure.
The file hide_location.service simply defines the service.
[Unit]
Description=Hide location DNS

[Service]
Type=oneshot
ExecStart=/etc/systemd/system/hide_location.sh
Besides of that, the file hide_location.timer specifies the conditions for launching the service. In our scenario, it triggers the service to start one minute after the computer boots up and then repeats every minute thereafter while you are using your workstation.
We may need it in case something goes wrong with your network interface and settings revert back to their initial state.
[Unit]
Description=Hide location DNS timer

[Timer]
OnBootSec=1m
OnUnitActiveSec=1m
Unit=hide_location.service

[Install]
WantedBy=timers.target
After creating these three files, you need to initiate your timer by executing the following commands in the Linux console.
sudo systemctl enable hide_location.timer
reboot
After rebooting, verify the changes by executing ‘resolvectl status’ in the Bash-terminal as shown on the picture below. If everything is ok, you will see that the current DNS server matches one of the OpenDNS servers 208.67.222.222 instead of the default DNS 192.168.0.1

This is really cool and with this simple trick, you have just enhanced your privacy on the warrior computer. In fact, you are now prepared to conduct your DNS leak test. Simply navigate to the website dnsleaktest.com and follow check your DNS privacy by clicking on the ‘Standard test’ option.
It should lead to the foreign country, not to yours.
But your IP is in trouble. Let’s fix it now.
Use SSL-based OpenVPN
As you are aware from the DNS leak test, we did in the previous chapter, your DNS is secure now. However, the same cannot be said for your actual public IP address, which is currently unsecured, as you have likely observed on the main page of the DNS Leak Test website.
Now, we are going to use a tunnel known as a VPN (Virtual Private Network). This creates a secure tunnel through which all your traffic passes. With this setup, nobody can determine your current location, and even your provider remains unaware of the destinations of the HTTP packages in your communications, as your traffic is encrypted.
VPN over SSL (Secure Sockets Layer) works on port 443 which is used for HTTPS traffic and is encrypted using SSL/TLS protocol. Using this configuration, VPN traffic can even bypass firewalls or other network restrictions that may be blocked by other VPN protocols.
So that, we will use this third part as well adding systemd service on Linux. As erlier, in the directory /etc/systemd/system we have to create file open_vpn.shas shown below.
#!/bin/bash

system_path="/etc/systemd/system"

mac_address="74:da:38:8b:a5:c2"
ping_server="208.67.220.220"
dns_default="192.168.0.1"

# Check if MAC is not hidden
if sudo ifconfig | grep -q $mac_address; then
    exit 1
fi

# Check ping to OpenDNS server
if ! sudo ping -c 4 $ping_server >/dev/null 2>&1; then
    exit 1
fi

# Check if DNS is not secured
if sudo resolvectl status | grep -q $dns_default; then
    exit 1
fi

# Check if VPN connection is not established
if ! sudo ifconfig | grep -q "tun1"; then
    vpn_config=$(shuf "$system_path/open_vpn.config" | head -n 1)
    sudo openvpn --config "$system_path/$vpn_config" --auth-user-pass "$system_path/vpnbook-password-tcp443.txt"
fi
As you may see from the listing above, initially, we verify whether the MAC address has been hidden. Then, we confirm whether the DNS leak has been resolved and the internet connection persists. After that, we examine if the VPN tunnel (tun1) is not yet established. If it has not been established yet, we initiate the VPN connection by randomly selecting one of the VPN configuration files listed in the open_vpn.config file.
The open_vpn.config file consist names for *.ovpn files with OpenVPN settings as a plain text. In our case just a list of three files.
The files open_vpn.serviceand open_vpn.timer share a similar structure to what we discussed in the previous trick with hide_location.timer, and it is not necessary to explain that again.
However, I’d like to describe a few another files available for download from the repository towards this article. The files vpnbook-de220-tcp443.ovpn, vpnbook-fr231-tcp443.ovpn, and vpnbook-uk68-tcp443.ovpn contain settings for the OpenVPN program. At the same time, the file vpnbook-password-tcp443.txtincludes the credentials for accessing the VPN service. I have downloaded all these files and credentials from the VPN Book website absolutely for free and you can do the same to update VPN settings to your own list, each time different.
As usually, after doing so, you need to initiate your VPN service timer by executing the following commands in the Linux console.
sudo systemctl enable open_vpn.timer
reboot
After rebooting, confirm the changes by running ‘ifconfig’ command in the Bash terminal, as illustrated in the picture below. If everything is correct, you will see the presence of tun1 in the list, indicating that the VPN connection is active.

Great, we have just finished the building of the third level of privacy on our warrior workstation, which is truly remarkable. However, what if, during the mission, something goes wrong, and some of the shields become compromised due to adversary actions, penetration, or active hacking?
Establish your own Security Guard
As mentioned above, there is a possibility that the computer could be compromised during your mission. In such a scenario, it’s crucial to be promptly alerted to mitigate the breach swiftly. To fix this issue, we will set up an additional Linux service tasked with monitoring for breaches while you are working on the workstation.
Let’s continue, go to the directory /etc/systemd/system as we did earlier and create there the following files.
#!/bin/bash

agent="GUARD"
mac_address="74:da:38:8b:a5:c2"
ping_server="208.67.220.220"
dns_default="192.168.0.1"

send_message()
{
   sudo -u under0 DISPLAY=:0 DBUS_SESSION_BUS_ADDRESS=unix:path=/run/user/1000/bus notify-send $agent "$1"
}

# Check if MAC is hidden
if sudo ifconfig | grep -q $mac_address; then
    send_message "MAC is not secured"
fi

# Check ping to OpenDNS server
if ! sudo ping -c 4 $ping_server >/dev/null 2>&1; then
    send_message "Internet connection lost"
fi

# Check DNS
if sudo resolvectl status | grep -q $dns_default; then
    send_message "DNS is not secured"
fi

# Check if VPN connection is not established
if ! sudo ifconfig | grep -q "tun1"; then
    send_message "VPN is not established"
fi
Similar to the previous script, this one conducts checks on all aspects of security: whether the MAC address has been changed, whether the DNS leak has been resolved, whether the internet connection persists, and whether the VPN connection is established.
If any of these conditions are not met, you will receive an appropriate message in the top right corner of the desktop, as shown below.

Therefore, with this Enhanced Security Guard, which you can actually name as you prefer (place it in the variable agent when you have your idea), you are fully protected and shielded, as was intended.
Fedora Linux Troubleshooting
In the latest distributions of Linux, you may encounter an issue where your services fail to function properly after being enabled. You can easily check the service status and health, as well as errors, by executing the following command sudo systemctl status hide_mac.service.
In most cases, this issue arises from the SELinux policy subsystem. If you are the only user of the computer, you likely don’t need this subsystem. Let’s explore a hotfix for this problem.
Go to Bash-terminal and execute the following:
sudo nano /etc/selinux/config

# find the line that says SELINUX=enforcing and change it to SELINUX=disabled.

# save the modifications.

reboot
After disabling SELINUX=disabled, you will not encounter such problems, and your computer will be shielded and protected at the same time.
What is next?
The general tricks have been established across all the services we created above. However, I would like to offer a few additional recommendations to further enhance your privacy on any computer, regardless of whether you use these techniques or not.
Implementing these suggestions will boost your privacy. Take your time to at least learn about them:
- DuckDuckGo is a search engine that does not track users’ search history, nor does it profile users based on their search behavior.
- The Tor Browser is a web browser specifically designed to conceal users’ identities and browsing activities by routing internet traffic through a series of encrypted relays.
- Email encryption can enhance the security of your communication, protecting it against eavesdropping and tampering. Even if intercepted, the encrypted email remains unreadable without the private key.
- XMPP protocol involves using end-to-end encryption and secure authentication mechanisms to ensure that messages are transmitted securely and cannot be intercepted by unauthorized parties.
In general, increasing your curiosity and exploring further options to shield your computer’s privacy will help you protect yourself and what is more important your warrior missions.
Remember to follow the law, at least in your country of residence, to avoid encountering in issues with law enforcement.
X-Files
I have uploaded all the scripts and Linux-service declarations used in this article to the git repository.
GitHub: Linux workstation privacy shielding with Bash-scripts
